Frozen shoulder treatments
Evidence-Based Physiotherapy Rehabilitation Program
This rehabilitation program is customized based on the MRI findings of your right shoulder: moderate adhesive capsulitis (frozen shoulder), a very small partial intrasubstance tear of the infraspinatus tendon, and a small posterosuperior labrum tear.
Phase 1: Pain Relief & Inflammatory Calming (Current Stage)
-
Medical Coordination: Discuss an ultrasound-guided intra-articular corticosteroid injection with your GP. In the frozen stage, a corticosteroid shot is highly recommended to reduce capsule inflammation, alleviate severe night pain, and open a “window of opportunity” for active physiotherapy.
-
In-Clinic Manual Therapy:
-
Gentle Mobilizations: Maitland Grade I and II joint glides to inhibit pain signals without stretching the inflamed capsular tissue.
-
Soft Tissue Release: Active Release Technique (ART) or dry needling to relax hyperactive muscles that are overcompensating (upper trapezius, levator scapulae, pectoralis minor).
-
-
Home Exercises: Passive or active-assisted movement (e.g., pendulum exercises and stick-assisted motion) strictly within a pain-free range.
Figure 1: Pendulum Exercise
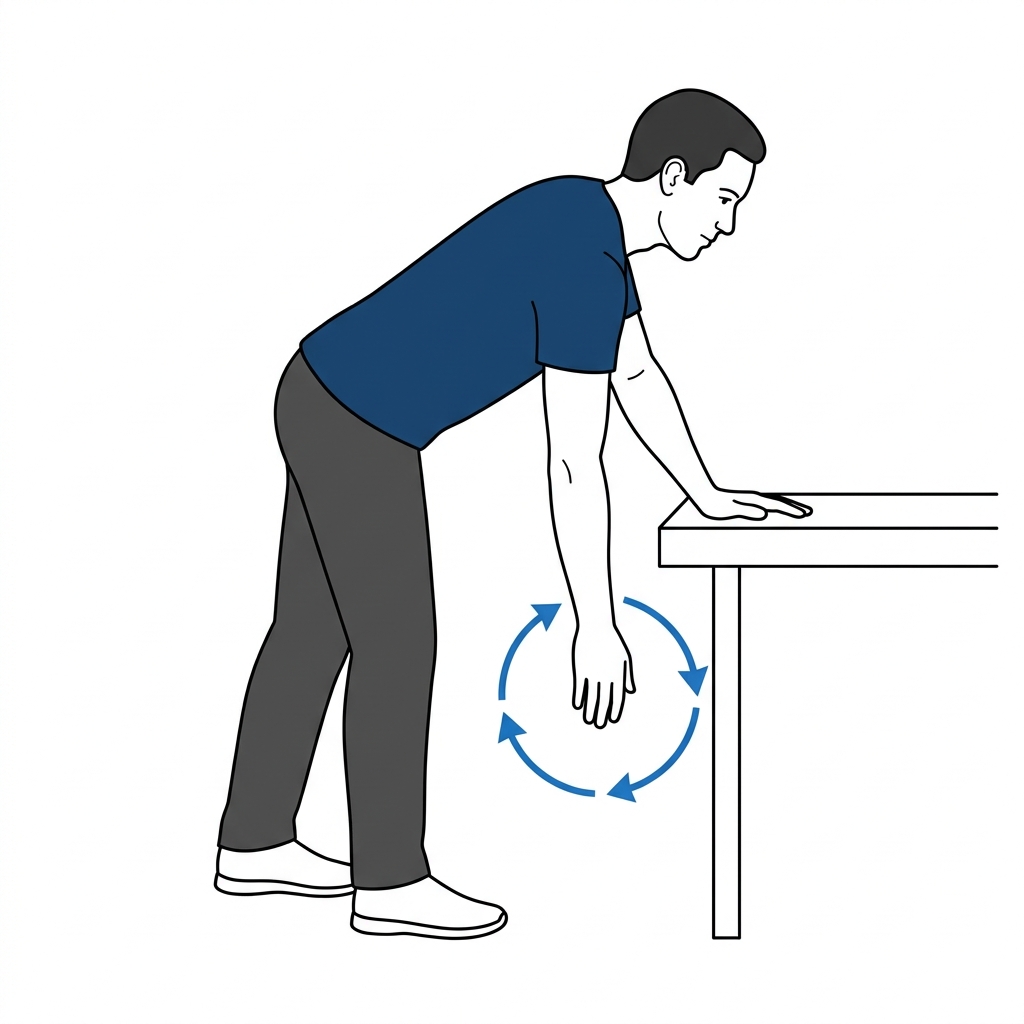
Lean forward, support yourself with your healthy arm on a table, let your injured arm hang straight down and swing in small, passive circles.
Figure 2: Wall Crawl Exercise
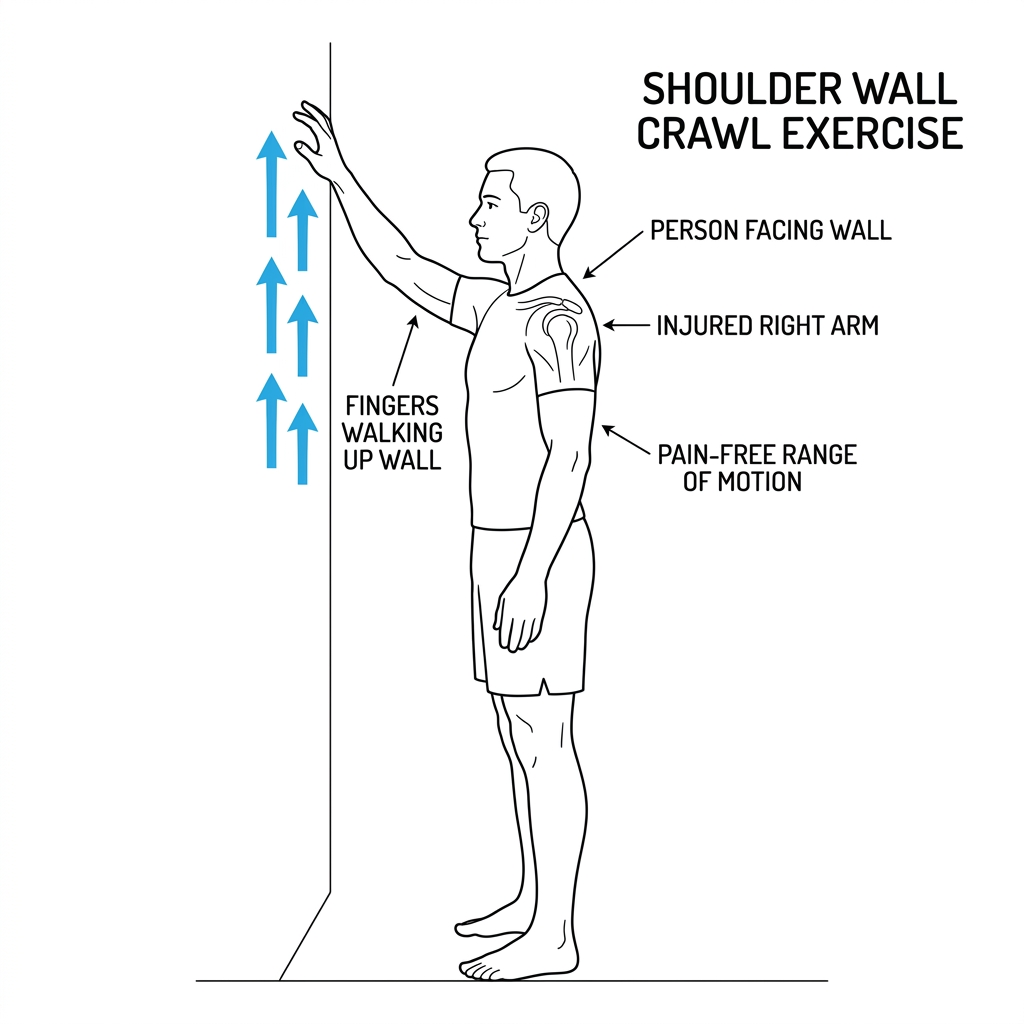
Walk your fingers slowly up a wall to lift your arm in a pain-free range of motion. Do not shrug your shoulder.
Phase 2: Restoring Movement & Rotator Cuff Activation (Transition to Thawing)
-
Scapular Re-education: Since the glenohumeral joint is stiff, your body will try to move the shoulder blade (scapula) excessively. We will train your scapular stabilizers (serratus anterior and lower trapezius) to restore normal shoulder-blade movement.
-
Tendon Remodeling (Infraspinatus):
- Because of the partial tendon tear, we must avoid heavy loads.
- We will start with Isometric External Rotation: Pressing your wrist outward against a wall at 30% effort, holding for 15 seconds. This stimulates blood flow, produces an analgesic (pain-relieving) effect, and initiates tendon healing without moving the joint.
Figure 3: Isometric External Rotation against Wall
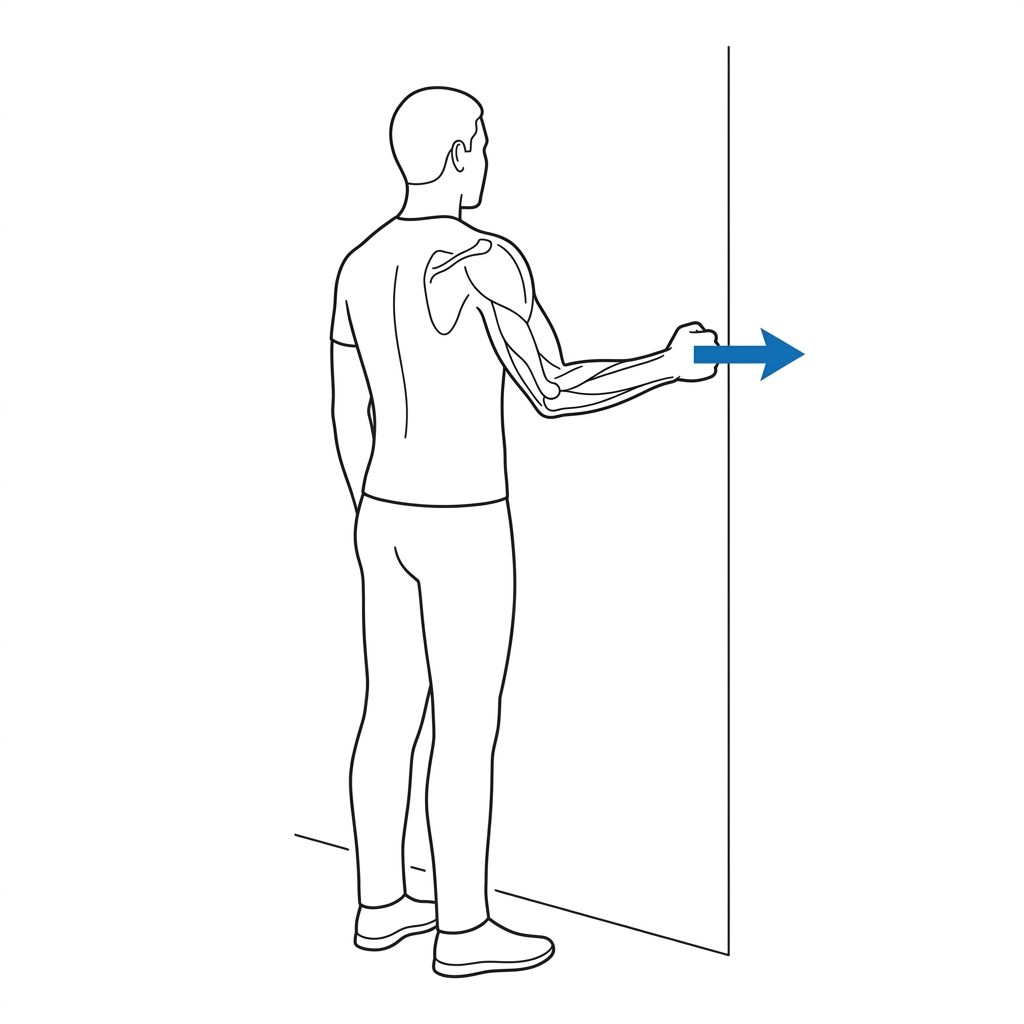
Bend elbow to 90 degrees, keep it tucked to your side, and press the back of your wrist/hand outward against a wall.
- Modified Stretching: Very gentle stretches to target the back of the joint capsule, modified to make sure we do not pinch the posterosuperior labrum.
Figure 4: Modified Sleeper Stretch (Internal Rotation)
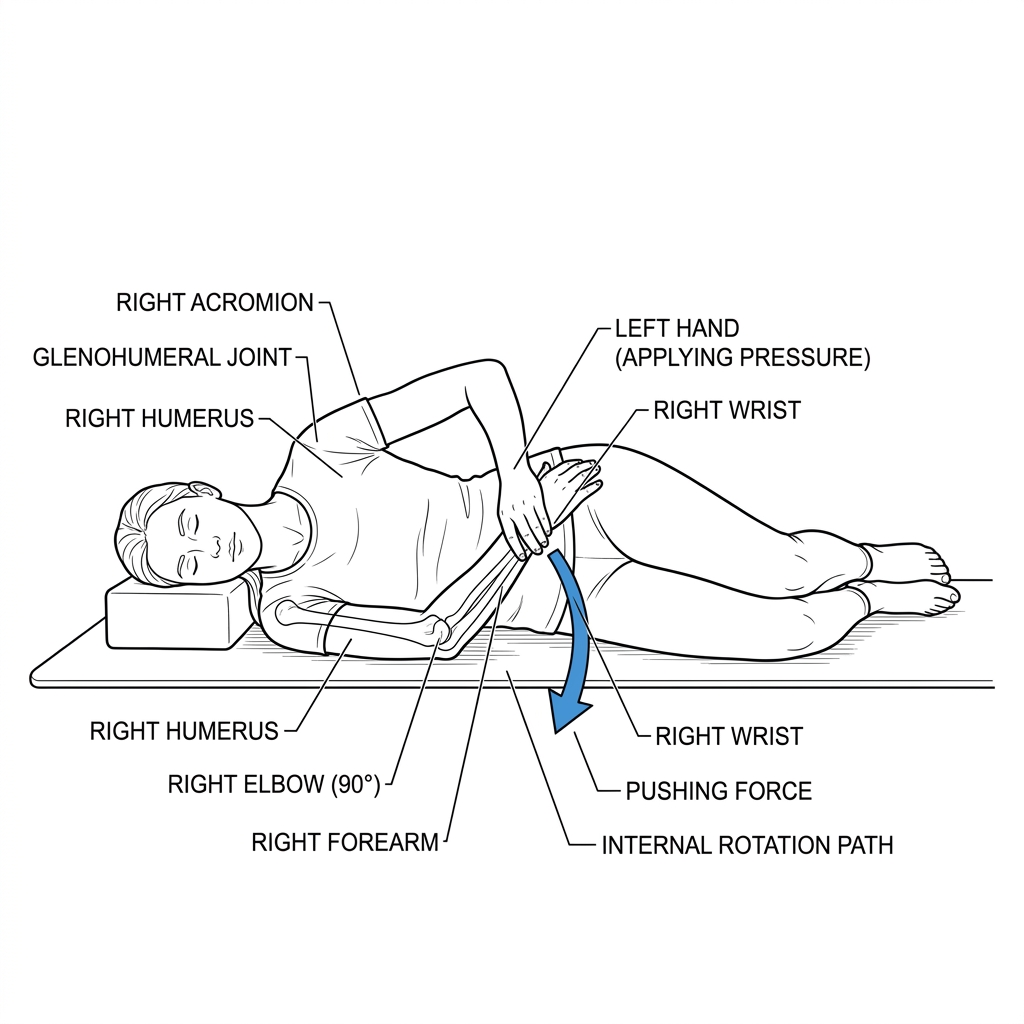
Lie on your injured side, bend elbow to 90 degrees pointing up, and gently push your wrist downward with your other hand. Keep it pain-free.
Phase 3: Strength Building & Dynamic Stabilization (Thawing Phase)
- Rotator Cuff Remodeling:
- Transition to Eccentric External Rotation (using light resistance bands). Controlling the return motion slowly (eccentric phase) is the gold standard for healing tendon tears, as it forces new collagen fibers to align and strengthen.
Figure 5: Eccentric External Rotation with Resistance Band
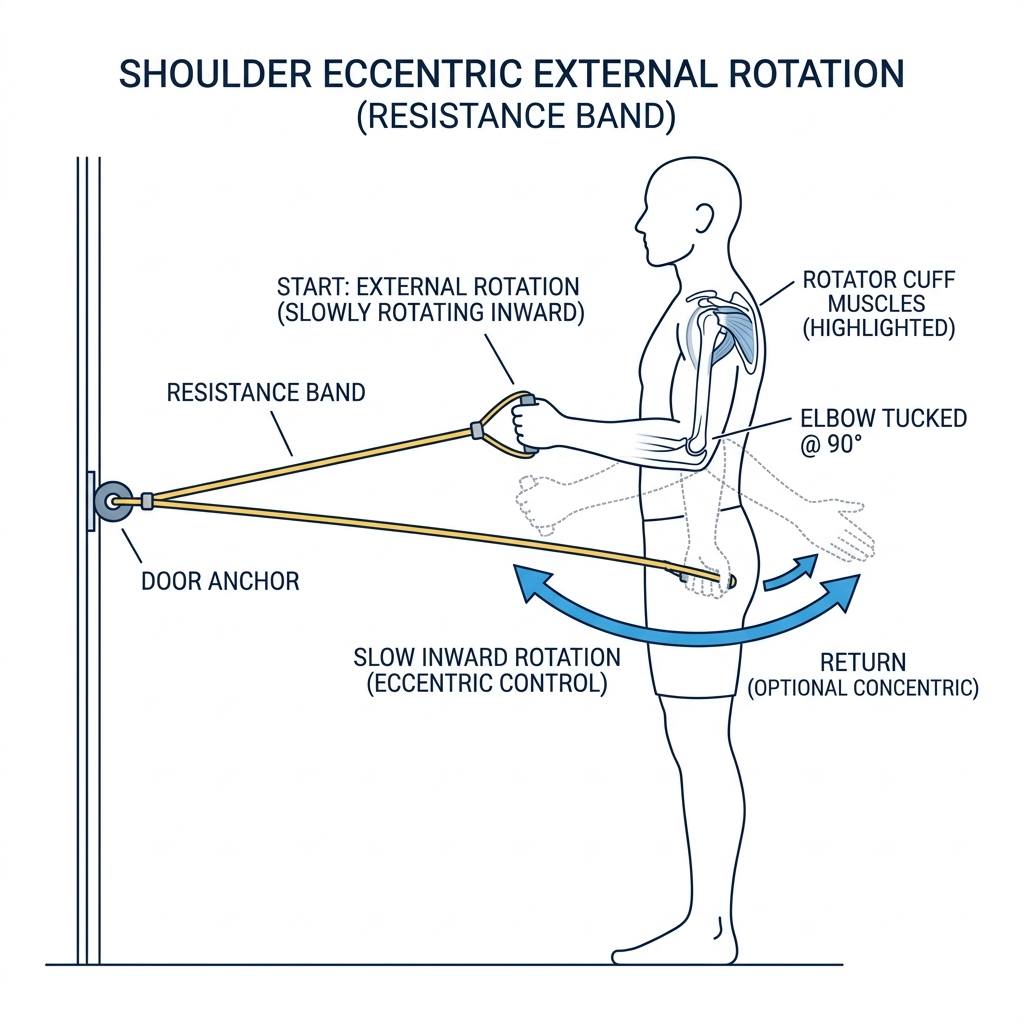
Keep elbow tucked at 90 degrees. Rotate hand outwards, then control the return motion slowly inward (resisting the band’s pull).
-
Dynamic Labral Stabilization: Since your labrum (the socket’s “bumper”) has a small tear, we must train the rotator cuff to keep the ball of your arm perfectly centered in the socket.
-
Rhythmic Stabilization: Interactive exercises where you hold your arm still while the therapist applies gentle, unpredictable perturbations in different directions.
Phase 4: Badminton-Specific Plyometrics & Return-to-Play
-
Speed & Proprioception: Fast acceleration and deceleration exercises using resistance bands to mimic badminton strokes.
-
Plyometrics: Throwing and catching light medicine balls against a rebounder, and performing overhead movements to prepare the joint for high-impact forces.
-
Gradual Racket Re-entry: Progression from low-line play (underhand clears, drops), to mid-line (drives), and finally back to overhead smashes. We will run rotator cuff endurance training to ensure your shoulder doesn’t fatigue and risk re-injury during matches.
Progression Guide & Timeline Rules
1. Progression Structure: One-by-One (Sequential)
Do not perform all phases or exercises at the same time. Because you have a frozen shoulder (highly sensitive joint capsule) combined with a partial infraspinatus tendon tear, loading the shoulder too quickly will trigger a severe inflammatory cycle. Exercises must be introduced sequentially.
- Current Focus: Stick strictly to Phase 1 passive/assisted mobilization (Pendulums and gentle, pain-free Wall Crawls).
2. Timeline for Advancing Phases
- Moving from Phase 1 to Phase 2 (Static Activation):
- Criteria:
-
Constant resting pain has decreased to a mild, predictable dull ache.
-
Severe night pain has stabilized or reduced.
-
Passive pendulums can be performed with zero discomfort.
-
- Action: Introduce low-effort Isometric External Rotation (Phase 2).
- Criteria:
- Moving from Phase 2 to Phase 3 (Resistive Loading):
- Criteria:
-
You can perform isometric presses at a moderate effort with zero pain during or 24 hours after.
-
Shoulder has begun to “thaw” (active movement range is returning).
-
Everyday low-reach tasks (e.g., reaching for a glass) do not trigger sharp pain.
-
- Action: Introduce light resistance band exercises, focusing on slow eccentric releases (Phase 3).
- Criteria:
- Moving from Phase 3 to Phase 4 (Sport-Specific Plyometrics):
- Criteria:
- Fully pain-free under load with resistance bands.
- Passive range of motion is near 90% of the healthy side.
- Core/scapular control is solid during movement.
- Action: Introduce plyometrics and controlled overhead racket play (Phase 4).
- Criteria:
3. The 24-Hour Pain Rule (Pacing Metric)
Use this standard clinical rule to monitor your recovery pace daily:
-
Acceptable discomfort: A mild, dull ache (under 3/10 on the pain scale) during or shortly after rehab is normal.
-
Irritation warning: If an exercise causes a sharp pain, or if your shoulder pain and stiffness remain elevated 24 hours after the exercise, the tissue is still too irritable.
-
Adjustment: Immediately stop that specific exercise, return to the previous phase for 3-5 days, and reduce the range of motion or resistance when you try again.